Sending Data
To use Data Exchange to Send Data, you must already have an RCS User ID and Password. To find out more about how to get one, see the Register page.
If you run Selector SQL, you may only send your data to other users of Selector SQL. If you also have Linker, the recipient does not also need to have Linker, but they will not have access to the Linker data. Your recipient will also need permission to license the database Call Letters you send them. Be sure to arrange this in advance.
The first time you send data with Data Exchange, the system will open a web page containing the Data Exchange Terms of Service agreement. Read the agreement and if you accept it, click the I ACCEPT button at the bottom.
- To send data, open RCS Menu and click Tools.
- Select the database to send so it is highlighted on the list.
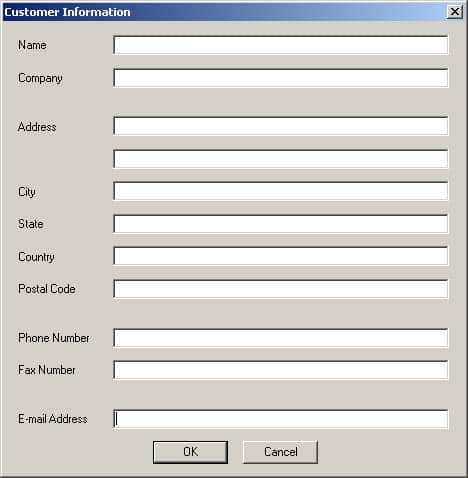
- On the File menu, select Data Exchange, then Send Database. The first time you do this, the Customer Information window appears:

- At minimum, fill in your Name, the Station or Company where you work and your Email address in the appropriate fields. Click OK. This screen no longer will appear during Data Exchange, but if you want to change anything later you can choose Help, then Customer Information from RCS Menu.

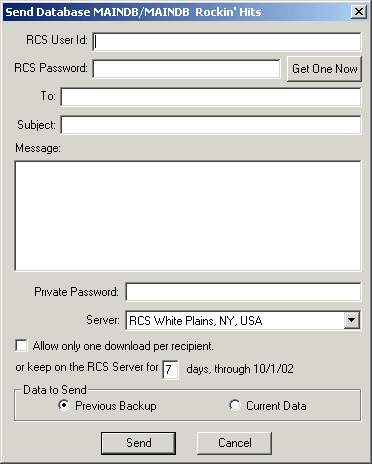
- Once the Customer Information screen has the minimum required information, the Send Data menu option will display the Send Database window. Fill in the controls as follows:
- RCS User ID: your RCS UserID goes here. In some cases this is the same as your email address. This value comes from the Email Address field on the Customer Information window (on the Help menu). If it is incorrect, open the Customer Information window to change it.RCS Password: type your RCS password in this box.Get One Now button: If your email address is on file at RCS, click this button to go to the RCS web site to request a User ID and Password via email.To: Put the email address of the person to whom you are sending the data. The data is not emailed to them, but a notification to pick up the database is sent when the data has been fully uploaded. The email address used here can be anyone’s email address, but only people who have Selector will be able to use the data you send them. If you wish to specify more than one recipient, put in multiple email addresses in this box with a comma separating each one. To send the data to RCS Support in New York, enter support@rcsworks.com.
Subject: (optional) This will be the subject line of the email notification sent to the recipient(s).
Message: (optional) This will be a text message which the email notification sent to the recipient(s) contains. Do not put your secret password in this message.
Private Password: (optional but recommended) Type a hard-to-guess password in this box. This will encrypt your database before sending it to RCS, and it will remain encrypted on the RCS server. The Recipient will need the Private Password in order to retrieve the database. Without this password, no one (including RCS) can access the database you are sending without resorting to sophisticated cryptographic password cracking. Give the Private password to the Recipient(s) through some other method than Data Exchange (such as private email, phone calls, etc.) NOTE: RCS strongly suggests you use a Private Password on all transmissions.
Server: There is only one selection available in this box. You may leave the setting as is.
Allow only one download per recipient: This control is no longer used.
Keep on the RCS server for [ ] days: This control is no longer used. Your data will be available for download for seven days.
Data to Send: In this box you indicate whether you wish to send a previous data backup or send the current database. If sending a previous backup, a pick list of available backups appears when you send. If you choose the current database, a fresh backup will be taken during the Send operation.
- Click the Send button to send the data. The software will display the progress of sending the data to RCS. Depending on your internet connection speed this will take several seconds to several minutes. The message “Data sent successfully” appears when the transfer is complete.
- When your database is available on the RCS Server, an email message is sent out to each Recipient email address you specified. Depending on how busy the RCS Data Exchange server is, this may take several minutes before the email notifications are sent.
Notes:
- RCS encourages you to make use of the Private Password to encrypt your data during upload and while on the RCS server. Your Recipient(s) will need this password.
- Do not include the Private Password of the database in the Subject or Message. Transmit that to the Recipient(s) separately.
- Data stored on the RCS server is destroyed when the seven day period elapses.
- Each upload of the same database is a separate backup on the Data Exchange Server. However when you send data to more than one recipient, the same data is delivered to each recipient within the single transmission.
- Each database can be kept on the RCS Server a maximum of seven days.
Keeping Track of your Sent Items
You may log in to the RCS web site to manage the Data Exchange databases you have sent using the My Data Exchange page. This page shows you the available databases, which ones have been downloaded and the Pickup IDs. It also shows any Databases that have been sent to you.
Receiving Data
In order to receive data through RCS Data Exchange, you must have a Data Exchange ID. This special ID is contained in an email notification that a user has sent you an RCS database. This notification will contain a text message such as:
You may download this item using Data Exchange ID 010F0104000000
The email notification will indicate which version of Selector will work with the data that was sent to you. You must be using that version of Selector in order to pick up the data.
When you have received your ID via email or from our web site, follow these steps to retrieve and install the database:
- Open RCS Menu and select Tools.
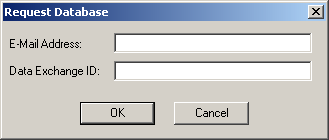
- On the File menu, select Receive Data. The Receive Data window appears:

- In the Email Address box, you should specify your own email address. This has to match the address the sender used to send the database to you.
- In the Data Exchange ID box, type in the Data Exchange ID from the e-mail. TIP: If the e-mail message is available on the same computer as that running Extender, open the e-mail and highlight the Data Exchange ID value only, then Copy the data using Ctrl-C (or Edit|Copy), then click inside the Data Exchange box and Paste using Ctrl-V. This process eliminates the chance you may enter the number incorrectly.
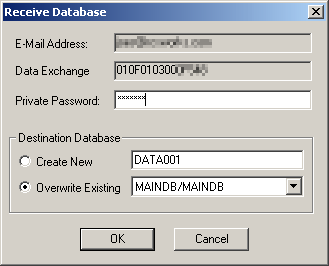
- Click OK to continue. The Receive Database window appears:

- If the Sender used a Private Password for this database, you must enter it in the Private Password box.
- In the Destination Database box, select whether to create a new database on your machine (Create New) to contain the data being sent to you, or if you wish to overwrite an existing database (and which database to overwrite). If creating a new database, you should name the folder to contain the new database.
- Click Receive Data to begin downloading the database. The software will display the progress of retrieving the data from RCS, unzipping it and licensing it. Depending on your internet connection speed this will take several seconds to several minutes. The message “Data successfully received” appears when the transfer is complete.
- Internet Licensing is automatically invoked to create a license for the database on your computer. If the license is successful, you may begin using the data. If not, contact RCS to resolve any licensing issues.
Notes:
The My Data Exchange web page lists the Pickup IDs of the databases you send and are sent. If you obtain the Pickup ID from this web site, you do not need to wait for the notification email to arrive.