There is a little known but quite extensive feature in GSelector that allows you to export many different kinds of data from the app to other formats or programs. Even better, exported data can be easily sent to one or more e-mail recipients. The magic is located in the File | Print menu command found in the upper left corner of the main GSelector window. This command is available in most windows throughout GSelector. Whenever you are in a window containing data you wish to export, chances are that the File | Print command will allow you to do so. This functionality can convert data in GSelector to a file format for use in a different program or for sharing with another.
When you invoke the File | Print menu command, a Preview window opens showing the data that is present in the underlying window. Here we’ve invoked the command from a song browse.
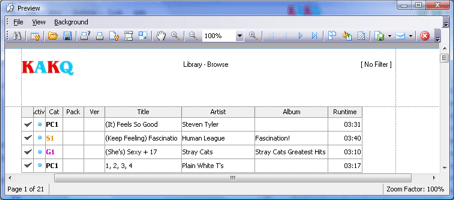
Note the horizontal row of toolbar buttons located near the top of the window. The third button from the right is Export Document. It’s the one you see highlighted here.
![]()
When you click the small down arrow on the right side of the Export Document button, a list of file formats drops down.
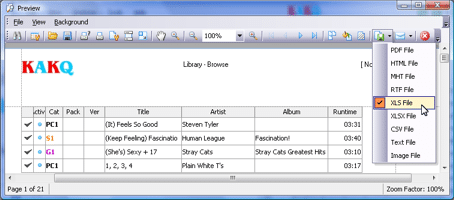
Clicking one of the options will cause the GSelector data to be converted to the selected file format:
- PDF: A file that can be opened in Adobe Reader
- HTML: A Web Page file that can be opened in a browser
- MHT: A Web page archive file containing images and other resources that are usually represented by links to external resources. This file can be opened in a Web browser.
- RTF: A rich text file that can be opened in Windows WordPad, Microsoft Word and several other programs
- XLS: A spreadsheet file that can be opened in Microsoft Excel
- XLSX: A spreadsheet file that can be opened in Microsoft Excel
- CSV: A comma delimited file that can be opened in Microsoft Excel and many other programs
- Text: A plain text file that can be opened in Windows’ Notepad, WordPad and many other programs
- Image: A file containing an image of the data in one of several possible formats that can be opened in any picture viewer supporting the format used
Selecting a file format from the dropdown opens a dialog box where you can set options for the file that will be created. The options vary according to the file format. For example, these options are available in the XLS Export Options dialog box.
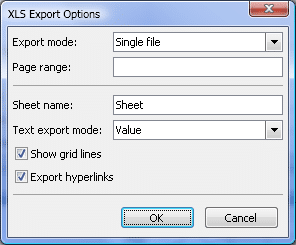
The export option dialog box for each file format allows you to customize the way the data file will be constructed. There are different options per format. We’ll see another a bit later.
Once you set the export options and click the OK button, you will be prompted to save the file. After the file has been saved, you will be asked if you wish to open it. Here is how our song browse appears in Microsoft Excel after we converted the data to the XLS file format and then opened the file in Excel:
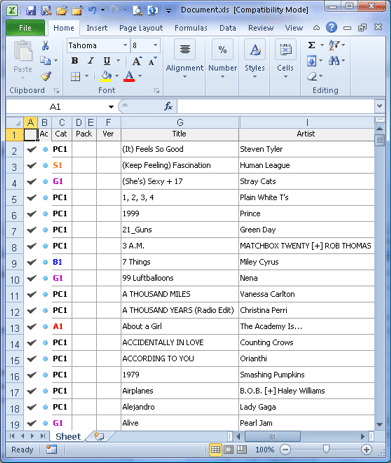
Of course, once the data is resident in another program you can use all the features of that program to further manipulate the data. In the case of Excel, we could resort the columns, add different font and colors per row or even create formulas for specialized data manipulation.
Working in the Preview window, you can also send converted data to an e-mail recipient quickly and easily. The second toolbar button from the right in the Preview window is Send via E-Mail. It’s the one you see highlighted below.
When you click the small down arrow on the right side of the Send via E-Mail, a dropdown list of file formats opens.
![]()
The options are the same as those in the Export Document dropdown with the exception of the HTML format. It is not included here since it can contain multiple file folders which cannot be attached to an e-mail. Otherwise the available file formats are the same as those described earlier.
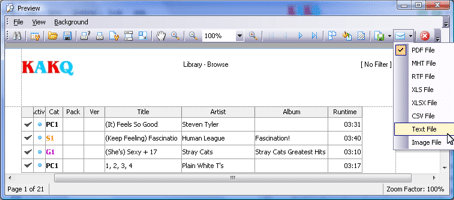
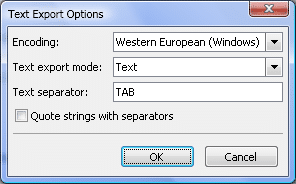
Selecting a file format from the Send via E-Mail dropdown opens a dialog box where you can set options for the file that will be created. As mentioned earlier, the options vary according to the file format. For example, these options in the Text Export Options dialog box are very different from those seen in the XLS Export Options dialog box. Seen earlier
Once you set the options and click the OK button, you will be prompted to save the file. After the file has been saved a blank e-mail message will be opened with the file attached. You can then add an address, subject line and message before sending the e-mail.
Think of all the data windows in GSelector and imagine the possibilities of easy data exports. You could quickly send a list of categories and their songs to your consultant. You could send a list of songs to be tested to your research company. You might need to send your group program director a list of most played songs or perhaps an image of the demand graph of your Sound Codes.
Almost all GSelector windows have this capability. Whatever the GSelector data, chances are extremely good that it can be exported following the basic steps shown here. If you can print from a window you can export from a window. Don’t forget this the next time you need to open GSelector data in another program or need to send some GSelector information via e-mail.